Tuesday, March 23, 2010

I maked a cake


I made a cake! I'm really proud of myself. Making cakes isn't something I really do, mostly because I usually lack the proper equipment. But! Last week I bought a springform pan from Sur La Table and this weekend set about making this cake. The only thing I did differently was substitute all-purpose flour for 1/2 whole wheat pastry flour and 1/2 bread flour. I like that combo, even if it's something I came up with out of necessity rather than any kind of baking genius.

You Need
1 small to medium orange
1 lemon
6 ounces raw almonds
1 cup all-purpose flour
1 Tbsp. baking powder
4 large eggs, ideally at room temperature
½ tsp. table salt
1 ½ cups sugar
2/3 cup olive oil
Confectioners’ sugar, for serving

You Do
... Follow Orangette's instructions. I'm too lazy to write them all out. I'll just say - watch when you pour the olive oil in, you will get these really cool batter caverns that close up after a few seconds.


Oh my god also the wiki article I linked to up there just taught me I can use this pan for PIZZA MAKING. Little Star, get ready for some competition.

Sunday, March 21, 2010

Corn muffins


I made corn muffins! Yum. I did a bit of experimenting on these, which was fun and successful! Yay.

I started with this recipe and did some substitutions based on what I had around. They were great!

You Need
1 cup cornmeal
1/2 cup whole wheat pastry flour
1/2 cup bread flour (I used the pastry and bread flours because I didn't have any all-purpose flour. Feel free to use 1 cup of all-purpose if you prefer.)
1/3 cup honey
2 teaspoons baking powder
1/2 teaspoon salt
1 egg, beaten
1/4 cup walnut oil
1 cup plain yogurt

You do
Preheat oven to 400 degrees F, butter your muffin tins. Mix your dry ingredients together, add your wet ingredients. Mix everything together nicely, then spoon into muffin tinnies. Bake for 15-20 minutes, until a toothpick inserted in a muffin comes out clean.

I think I had to cook these for a little while longer because of the yogurt - play it by ear. Since I used honey instead of sugar, these were more like cornbread muffins than regular corn muffins; sweet-tooth-people may want to add more honey (or just use sugar).

Thursday, March 11, 2010

Farfalle with Brussels Sprouts and Pistachio


I ate something like this over the weekend and made it my project tonight to recreate it in some capacity. I think I succeeded!


This is a tangy, nutty pasta salad with few ingredients but big flavor. I hope you like it.

You Need
1 lb brussels sprouts
3/4 to 1 lb farfalle (bowtie) pasta
1 lemon
1 little shallot
3/4 cup pistachios
1 tbsp butter
salt & pepa


You Do
Cut the tough ends off your sprouties, remove gross leafies, and slice into little... slicies. See below.


Put water on for the pasta. Chop up your shallot nice and small and start some butter in the pan. Add the shallots, saute for a bit then add sprouties. Saute again until the sprouts start browning and softening a bit. Toss in the pistachios, saute a little bit more, add salt n' pepa for taste. When the pasta is done, drain and add everything together. Add the juice from the lemon, more pepper and salt if you need it, and enjoy!


Yomyomyom

Monday, October 5, 2009

Millions of peaches, peaches for me


Hello team! Yesterday I needed to blow off some steam (pun pun pun) so I made a small batch of Spice Peach jam using a recipe and inspiration from my most recent acquisition, The Big Book of Preserving the Harvest. Guys, this book rocks. If you have any interest in canning, drying, freezing or otherwise hanging on to your fruits, veggies and recipes - this is the book. The instructions are thorough and user-friendly, with helpful anecdotes from the author's personal experience of a lifetime of preserving. This recipe came from that book, as did all the instructions for making it through my first attempt at home canning, and (so far; I'm hoping) the experiment was fully successful. Go me!

Here's how it happened.

I got motivated. I picked up the book at the cookery store down the street from me, and have been reading up on the equipment I need and the time investment I should count on for the process over the past week. Yesterday, I picked a recipe, knowing peaches wouldn't be available at the farmer's market too much longer, and set out to collect equipment and ingredients.

I stopped by the hardware store on my way to the farmer's market and bought a flat of (12) 1/2 pint jars. I also searched unsuccessfully for a jar lifter and (foolishly) forwent buying a canning funnel. It worked out pretty well without either piece but would have been easier with.

Ran off to the farmer's market and bought some veggies for the week; scored a free handful of hot chilies; and collected the 7 huge peaches I'd need for my recipe. Nom nom nom.

Now - for the good stuff.

Equipment
I'll just say right off the bat that I did not really have the appropriate equipment for this adventure. The large soup pot I use for everything, all the time is not really tall enough for canning - you're supposed to allow for 2 inches of extra water ("boiling room") above the jars when using the boiling water bath canning method, which only sort of worked when I laid the jars on their side (which I hear is a bad idea as the jars can crack). Anyway. I also didn't have a canning rack, which is supposed to sit on the bottom of the pot so the jars don't come in contact with the hot pot bottom. Lacking this piece put me in constant fear that my jars would explode while boiling, which turned out to (of course) be unfounded worry-worting.

Here's what I did have:

Aforementioned soup pot
Aforementioned jars and lids
Wooden spoon
Ladle
Smaller saucepans for boiling jar lids and transferring jam from large pot

And that's really all you need, at least to do it in the bootleg fashion I'll describe below. Hurrah!

Ingredients
4 pounds ripe but firm peaches, or about 7-8 large ones
5 cups (I KNOW) sugar
2 tablespoons lemon juice
1/4 teaspoon nutmeg
1/8 teaspoon cinnamon

That's it. Seriously. I was totally terrified by the 5 cups of sugar thing but what're you gonna do? I don't eat that much jam anyway.

Process
Phew. Bear with me folks, this is going to be a long one.

1. Peel, pit and chop your peaches. Chop 'em into small, bite-sized chunks; they'll break down a fair amount during cooking, but you'll be left with some amount of chunkiness, so make 'em small.

2. Throw all the ingredients in a large pot and cook on medium heat until sugar is dissolved.


3. Turn up the heat a bit and bring ingredients to a boil (DON'T put the lid on right now or you will be dealing with goopy sugary mess all over your stovetop. I did this TWICE, actually TWICE, and kept having to switch burners so I could clean the crap off the one I'd been using). Boil forever, or probably an hour, until mixture reaches 220 degrees F or until a glob of mixture slides off your spoon without glomming. You know what I mean. Look up "sheeting" if you don't.

5. While you're waiting, you can clean your jars and ready the lids. Since we're boiling our finished jars for longer than 10 minutes, the empty jars don't need to be fully sterilized first - just soak them in warm, soapy water for a little while and rinse/dry them well. Place your lids in a pot of gently boiling water to prepare the sealant. You don't need to boil the screw-tops; leave those with the jars.


5. In my case, since the only pot I had that was large enough to hold 4 pounds of chopped peaches was also the pot I planned to can in, I had to ladle the finished fruit goop into a smaller pot. Kind of a pain but not that big of a deal. I cleaned out my soup pot and filled it halfway with water, then brought it close to boiling (it's supposed to be 180 degrees but I didn't have a thermometer and it worked out ok. Hah!).

5. Fill your jars! If I had a canning funnel, this is where it would have really come in handy. As it was I had to ladle small amounts very carefully into each jar, then clean any drips off with a wet dishtowel. The jars should be filled with 1/4 inch of "headspace," or the space between the very top of the jar and the filling. Too much headspace translates to too much air for the boiling/vacuum-creating process to suck out, leading to an incorrect seal. Too little and the jars can overflow as the contents expand. Make sure you clean the outside of the threading carefully so the screw-tops don't stick. Add your lids and screw-tops and you're ready to can! Yuss!
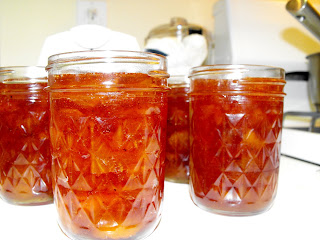

6. The water in your boiling-water-bath-canner should be slowly boiling now, or at least with those little bubbles at the bottom that appear before boiling; add your jars. I just placed mine on their sides so they'd be fully submerged. Add more boiling (or hot) water so the water level is 2 inches above the tops of the jars. Bring to a vigorous boil.


7. Once boiling, set a timer for 15 minutes and turn down the heat to maintain a gentle boil throughout the 15 minutes. I had trouble with this because I kept getting distracted by Harry Potter on TV, so I'd go back to the pot to check and find that it stopped boiling entirely, but as long as you have at least a 5-minute attention span you should be ok.

8. When the timer goes off, get those jars outta there. Again, this would be a great point at which to have the correct equipment, but lacking a jar-lifter I executed a precarious ladle-and-wooden-spoon balancing act and tipped the jars right-side up onto a dishtowel. Let them cool for 12-24 hours and check the seal. If the lid does NOT compress, you've got yourself a seal! Good job!

So there you have it, folks. Real life home-preserving, without any exploded jars or spoiled frutas. I can't wait to try out this jam! Yum yum!

Sunday, September 13, 2009

More Stuffed Peppers (Vegetarian)


One of the best things to have come from writing this blog, and from cooking more in general, is that I feel much more empowered to make things up as I go along. The other night, I made things up to fantastic success!

This was inspired by the similarly fantastic success of the camp-gourmet adventure a few weeks ago. I received 2 yummy little red bell peppers in my CSA, and I decided to cook up some tofu and quinoa to stuff them with. It turned out SO well and I ate the leftovers for dinner the next day.

Ingredients
Bell peppers (1 per person) - more if they are little baby peppers like mine were
Package of tofu (not super soft, not super firm)
Pre-cooked quinoa, or couscous, or Italian couscous, or rice, or whatever (about 1/2 a cup, but you can use more if you want)
1 or 2 little tomatoes, chopped
1 little onion


Garlic (2 + cloves)
Curry powder
Cumin


Process
-Preheat oven to 350
-Cut the top off your bell pepper (the top being the part with the stem), core, and place open-side-down on a cookie sheet.
-Drizzle pepper with olive oil, maybe some garlic salt if you're feelin' it, and pop it in the oven for 15 minutes.


-Saute finely chopped onions and garlic in olive oil for a few minutes, then add tomatoes.
-Throw a bunch of curry powder in there: probably a tablespoon or so, then let things hang out and get delicious for a few minutes.
-Meanwhile, slice the tofu, then take slices in your hands and CRUSH. This is the best and most fun part of making this dish. Crush the tofu into a bowl until it's all crumbled and delicious-looking. If you're like me, eat a little bit of the raw tofu to hold you over (yum yum yum).
-Add the tofu to your onions-garlic-tomato mixture and combine thoroughly. You may want to add some more curry powder at this point, but taste it first. Add as much cumin as you want, depending on your spiciness threshold. I don't remember how much I added, whoops! :) Probably not very much, as I am a spiciness wimp.
-SALT AND PEPPER
-Add your precooked quinoa. I think I ended up putting in about 1/2 a cup, but you can add as much or as little as you want. My dish ended up being more about the tofu than the quinoa, so you may want to add more if you're into that.

Don't forget about your pepper. Take it out of the oven and tip it over so the steam can escape, let it cool for a little while, then stuff with tofu mixture and eat-eat-eat. Leftovers keep for a few days, and will be delicious re-heated and added to a brand new roasted pepper. This is my new favorite meal, and will probably make an appearance in my dinner regimen two or three times a week from now on. It's just SO quick and easy! Love it!

Wednesday, August 26, 2009

New Idea!

I'm constantly bookmarking and printing and emailing to myself different recipes I want to try. Instead, I think I'm just going to start posting them here! Then I'll be more motivated to actually try them, and post about them.

I also have a new little toy that will soon make it's debut among these pages...

This recipe is from this week's Terra Firma newsletter. Yay CSA!

Chicken Fricasee — If you don’t eat meat, make this stew with extra potatoes as well as summer squash.

Ingredients
Canola oil
Olive oil
1 lb. chicken breast/thighs/wings
1 or 2 onions
2 cups seeded, cored and thinly sliced sweet peppers (they suggest Gypsy peppers)
4 cups diced tomatoes
a handful of chopped basil leaves
1 cup diced green olives
1-2 pounds of potatoes
red chili flakes

Process
Preheat the oven to 375.
Heat 1 T. canola oil in a frying pan and fry 1 lb. of chicken breasts, thighs, or wings until browned on both sides. Remove from heat and set aside.
Heat 3 T. olive oil in a cast iron skillet and add 1 large or 2 medium onions, thinly sliced, in half rounds.
When the onion is soft, add 2 C. seeded and cored sweet peppers, also thinly sliced as well as a dash of red chile flakes.
Cook for 7-10 minutes on medium high heat, then add 3 minced cloves of garlic. Saute another 1-2 minutes, then add 4 C. diced tomatoes, a handful of chopped Basil leaves, and 1 C. diced green olives. Lower the heat and simmer for 10 minutes.
Meanwhile, clean and dice 1-2 lbs. of potatoes. Add to the sauce with the chicken and its juices, if using.
Bake, covered, for 40 minutes or until the potatoes and chicken are tender and fully cooked. Season with salt and pepper.

Sunday, August 16, 2009

Calzones


With inspiration from bread and honey, I decided to embark on a calzone-making adventure. It was really successful! Yum yum. I made the pizza dough a day early, using another b & h recipe. There's actually a funny story about that -- I knew I wanted to make the calzones the next day, so I just wrapped the dough up in saran wrap and put it in the fridge. HILARIOUS mistake, as when I opened the fridge the next morning, the dough had continued to rise and these bulbous, crusty growths had popped through the wrapping! I decided it probably wasn't a big deal and just ripped off the growths and used the dough as normal. Wish I'd thought to take picture of them -- maybe I'll do it again one of these days just to have the photographic evidence. The pizza dough was seriously the bomb, though, and perfect, so use it!

Here's what I did.


Ingredients
You can really use whatever you want. I used my favorite pizza toppings!
1 green bell pepper
black olives
pepperoni
tomato sauce
fresh mozzarella
pizza dough

Process
Preheat oven to 500 degrees (I KNOW- don't do this in the summer unless you live in San Francisco!)

Chop up the bell pepper, olives and pepperoni. You'll have to use your best judgment on ratios, but if it looks delicious you've probably pretty much done it right. So you'll chop them all up and put them in a bowl, then add your mozzarella (also either grated or in small chunks) and tomato sauce. A word on the sauce: don't add too much! It'll get fairly watery inside the calzone, so you don't need as much as you think you do. Trust me.

Ok, so you have your awesome-looking mixture of calzone innards. Put that aside. Take your pizza dough and tear or cut off baseball-sized pieces to roll out into calzone casing. Lightly flour your rolling surface and roll out a piece of pizza dough until it is very thin and circular. Add your calzone filling onto half the rolled-out dough, fold over the other half and pinch the sides so they stay put.


Once you've made a few, you'll be ready to put your first batch in the oven. I used the amazing cast iron grill pan I splurged on in the fall, and it worked really well! I found that I could cook about 3 at a time, so I lightly dusted my pan with cornmeal and laid the calzones on the pan. Put 'em in the oven for about 5-7 minutes, then flip them over and cook for another few minutes.


Let them cool a little on top of the stove after you take them out, then eat like crazy!


Yum!!