Monday, October 5, 2009
Millions of peaches, peaches for me
Hello team! Yesterday I needed to blow off some steam (pun pun pun) so I made a small batch of Spice Peach jam using a recipe and inspiration from my most recent acquisition, The Big Book of Preserving the Harvest. Guys, this book rocks. If you have any interest in canning, drying, freezing or otherwise hanging on to your fruits, veggies and recipes - this is the book. The instructions are thorough and user-friendly, with helpful anecdotes from the author's personal experience of a lifetime of preserving. This recipe came from that book, as did all the instructions for making it through my first attempt at home canning, and (so far; I'm hoping) the experiment was fully successful. Go me!
Here's how it happened.
I got motivated. I picked up the book at the cookery store down the street from me, and have been reading up on the equipment I need and the time investment I should count on for the process over the past week. Yesterday, I picked a recipe, knowing peaches wouldn't be available at the farmer's market too much longer, and set out to collect equipment and ingredients.
I stopped by the hardware store on my way to the farmer's market and bought a flat of (12) 1/2 pint jars. I also searched unsuccessfully for a jar lifter and (foolishly) forwent buying a canning funnel. It worked out pretty well without either piece but would have been easier with.
Ran off to the farmer's market and bought some veggies for the week; scored a free handful of hot chilies; and collected the 7 huge peaches I'd need for my recipe. Nom nom nom.
Now - for the good stuff.
Equipment
I'll just say right off the bat that I did not really have the appropriate equipment for this adventure. The large soup pot I use for everything, all the time is not really tall enough for canning - you're supposed to allow for 2 inches of extra water ("boiling room") above the jars when using the boiling water bath canning method, which only sort of worked when I laid the jars on their side (which I hear is a bad idea as the jars can crack). Anyway. I also didn't have a canning rack, which is supposed to sit on the bottom of the pot so the jars don't come in contact with the hot pot bottom. Lacking this piece put me in constant fear that my jars would explode while boiling, which turned out to (of course) be unfounded worry-worting.
Here's what I did have:
Aforementioned soup pot
Aforementioned jars and lids
Wooden spoon
Ladle
Smaller saucepans for boiling jar lids and transferring jam from large pot
And that's really all you need, at least to do it in the bootleg fashion I'll describe below. Hurrah!
Ingredients
4 pounds ripe but firm peaches, or about 7-8 large ones
5 cups (I KNOW) sugar
2 tablespoons lemon juice
1/4 teaspoon nutmeg
1/8 teaspoon cinnamon
That's it. Seriously. I was totally terrified by the 5 cups of sugar thing but what're you gonna do? I don't eat that much jam anyway.
Process
Phew. Bear with me folks, this is going to be a long one.
1. Peel, pit and chop your peaches. Chop 'em into small, bite-sized chunks; they'll break down a fair amount during cooking, but you'll be left with some amount of chunkiness, so make 'em small.
2. Throw all the ingredients in a large pot and cook on medium heat until sugar is dissolved.
3. Turn up the heat a bit and bring ingredients to a boil (DON'T put the lid on right now or you will be dealing with goopy sugary mess all over your stovetop. I did this TWICE, actually TWICE, and kept having to switch burners so I could clean the crap off the one I'd been using). Boil forever, or probably an hour, until mixture reaches 220 degrees F or until a glob of mixture slides off your spoon without glomming. You know what I mean. Look up "sheeting" if you don't.
5. While you're waiting, you can clean your jars and ready the lids. Since we're boiling our finished jars for longer than 10 minutes, the empty jars don't need to be fully sterilized first - just soak them in warm, soapy water for a little while and rinse/dry them well. Place your lids in a pot of gently boiling water to prepare the sealant. You don't need to boil the screw-tops; leave those with the jars.
5. In my case, since the only pot I had that was large enough to hold 4 pounds of chopped peaches was also the pot I planned to can in, I had to ladle the finished fruit goop into a smaller pot. Kind of a pain but not that big of a deal. I cleaned out my soup pot and filled it halfway with water, then brought it close to boiling (it's supposed to be 180 degrees but I didn't have a thermometer and it worked out ok. Hah!).
5. Fill your jars! If I had a canning funnel, this is where it would have really come in handy. As it was I had to ladle small amounts very carefully into each jar, then clean any drips off with a wet dishtowel. The jars should be filled with 1/4 inch of "headspace," or the space between the very top of the jar and the filling. Too much headspace translates to too much air for the boiling/vacuum-creating process to suck out, leading to an incorrect seal. Too little and the jars can overflow as the contents expand. Make sure you clean the outside of the threading carefully so the screw-tops don't stick. Add your lids and screw-tops and you're ready to can! Yuss!
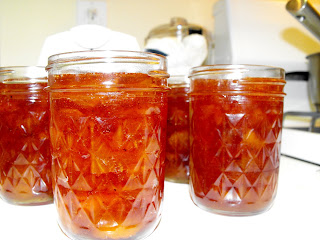
6. The water in your boiling-water-bath-canner should be slowly boiling now, or at least with those little bubbles at the bottom that appear before boiling; add your jars. I just placed mine on their sides so they'd be fully submerged. Add more boiling (or hot) water so the water level is 2 inches above the tops of the jars. Bring to a vigorous boil.
7. Once boiling, set a timer for 15 minutes and turn down the heat to maintain a gentle boil throughout the 15 minutes. I had trouble with this because I kept getting distracted by Harry Potter on TV, so I'd go back to the pot to check and find that it stopped boiling entirely, but as long as you have at least a 5-minute attention span you should be ok.
8. When the timer goes off, get those jars outta there. Again, this would be a great point at which to have the correct equipment, but lacking a jar-lifter I executed a precarious ladle-and-wooden-spoon balancing act and tipped the jars right-side up onto a dishtowel. Let them cool for 12-24 hours and check the seal. If the lid does NOT compress, you've got yourself a seal! Good job!
So there you have it, folks. Real life home-preserving, without any exploded jars or spoiled frutas. I can't wait to try out this jam! Yum yum!
Posted by
Lena
Labels:
canning,
Create-Your-Own Pantry,
fruit,
improvisation,
recessionistas
Sunday, September 13, 2009
More Stuffed Peppers (Vegetarian)
One of the best things to have come from writing this blog, and from cooking more in general, is that I feel much more empowered to make things up as I go along. The other night, I made things up to fantastic success!
This was inspired by the similarly fantastic success of the camp-gourmet adventure a few weeks ago. I received 2 yummy little red bell peppers in my CSA, and I decided to cook up some tofu and quinoa to stuff them with. It turned out SO well and I ate the leftovers for dinner the next day.
Ingredients
Bell peppers (1 per person) - more if they are little baby peppers like mine were
Package of tofu (not super soft, not super firm)
Pre-cooked quinoa, or couscous, or Italian couscous, or rice, or whatever (about 1/2 a cup, but you can use more if you want)
1 or 2 little tomatoes, chopped
1 little onion
Garlic (2 + cloves)
Curry powder
Cumin
Process
-Preheat oven to 350
-Cut the top off your bell pepper (the top being the part with the stem), core, and place open-side-down on a cookie sheet.
-Drizzle pepper with olive oil, maybe some garlic salt if you're feelin' it, and pop it in the oven for 15 minutes.
-Saute finely chopped onions and garlic in olive oil for a few minutes, then add tomatoes.
-Throw a bunch of curry powder in there: probably a tablespoon or so, then let things hang out and get delicious for a few minutes.
-Meanwhile, slice the tofu, then take slices in your hands and CRUSH. This is the best and most fun part of making this dish. Crush the tofu into a bowl until it's all crumbled and delicious-looking. If you're like me, eat a little bit of the raw tofu to hold you over (yum yum yum).
-Add the tofu to your onions-garlic-tomato mixture and combine thoroughly. You may want to add some more curry powder at this point, but taste it first. Add as much cumin as you want, depending on your spiciness threshold. I don't remember how much I added, whoops! :) Probably not very much, as I am a spiciness wimp.
-SALT AND PEPPER
-Add your precooked quinoa. I think I ended up putting in about 1/2 a cup, but you can add as much or as little as you want. My dish ended up being more about the tofu than the quinoa, so you may want to add more if you're into that.
Don't forget about your pepper. Take it out of the oven and tip it over so the steam can escape, let it cool for a little while, then stuff with tofu mixture and eat-eat-eat. Leftovers keep for a few days, and will be delicious re-heated and added to a brand new roasted pepper. This is my new favorite meal, and will probably make an appearance in my dinner regimen two or three times a week from now on. It's just SO quick and easy! Love it!
Posted by
Lena
Labels:
CSA,
dinner,
peppers,
Quick 'n Easy,
quinoa,
tofu,
vegetarian
Wednesday, August 26, 2009
New Idea!
I'm constantly bookmarking and printing and emailing to myself different recipes I want to try. Instead, I think I'm just going to start posting them here! Then I'll be more motivated to actually try them, and post about them.
I also have a new little toy that will soon make it's debut among these pages...
This recipe is from this week's Terra Firma newsletter. Yay CSA!
Chicken Fricasee — If you don’t eat meat, make this stew with extra potatoes as well as summer squash.
Ingredients
Canola oil
Olive oil
1 lb. chicken breast/thighs/wings
1 or 2 onions
2 cups seeded, cored and thinly sliced sweet peppers (they suggest Gypsy peppers)
4 cups diced tomatoes
a handful of chopped basil leaves
1 cup diced green olives
1-2 pounds of potatoes
red chili flakes
Process
Preheat the oven to 375.
Heat 1 T. canola oil in a frying pan and fry 1 lb. of chicken breasts, thighs, or wings until browned on both sides. Remove from heat and set aside.
Heat 3 T. olive oil in a cast iron skillet and add 1 large or 2 medium onions, thinly sliced, in half rounds.
When the onion is soft, add 2 C. seeded and cored sweet peppers, also thinly sliced as well as a dash of red chile flakes.
Cook for 7-10 minutes on medium high heat, then add 3 minced cloves of garlic. Saute another 1-2 minutes, then add 4 C. diced tomatoes, a handful of chopped Basil leaves, and 1 C. diced green olives. Lower the heat and simmer for 10 minutes.
Meanwhile, clean and dice 1-2 lbs. of potatoes. Add to the sauce with the chicken and its juices, if using.
Bake, covered, for 40 minutes or until the potatoes and chicken are tender and fully cooked. Season with salt and pepper.
Posted by
Lena
Labels:
chicken,
CSA,
dinner,
peppers,
Terra Firma
Sunday, August 16, 2009
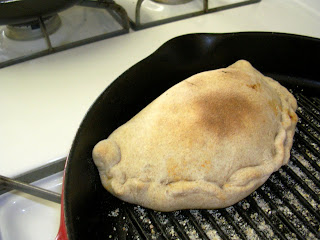
Calzones
With inspiration from bread and honey, I decided to embark on a calzone-making adventure. It was really successful! Yum yum. I made the pizza dough a day early, using another b & h recipe. There's actually a funny story about that -- I knew I wanted to make the calzones the next day, so I just wrapped the dough up in saran wrap and put it in the fridge. HILARIOUS mistake, as when I opened the fridge the next morning, the dough had continued to rise and these bulbous, crusty growths had popped through the wrapping! I decided it probably wasn't a big deal and just ripped off the growths and used the dough as normal. Wish I'd thought to take picture of them -- maybe I'll do it again one of these days just to have the photographic evidence. The pizza dough was seriously the bomb, though, and perfect, so use it!
Here's what I did.
Ingredients
You can really use whatever you want. I used my favorite pizza toppings!
1 green bell pepper
black olives
pepperoni
tomato sauce
fresh mozzarella
pizza dough
Process
Preheat oven to 500 degrees (I KNOW- don't do this in the summer unless you live in San Francisco!)
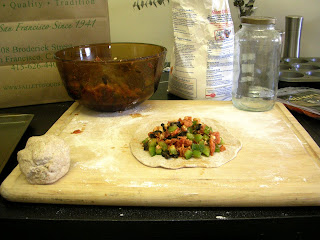
Chop up the bell pepper, olives and pepperoni. You'll have to use your best judgment on ratios, but if it looks delicious you've probably pretty much done it right. So you'll chop them all up and put them in a bowl, then add your mozzarella (also either grated or in small chunks) and tomato sauce. A word on the sauce: don't add too much! It'll get fairly watery inside the calzone, so you don't need as much as you think you do. Trust me.
Ok, so you have your awesome-looking mixture of calzone innards. Put that aside. Take your pizza dough and tear or cut off baseball-sized pieces to roll out into calzone casing. Lightly flour your rolling surface and roll out a piece of pizza dough until it is very thin and circular. Add your calzone filling onto half the rolled-out dough, fold over the other half and pinch the sides so they stay put.
Once you've made a few, you'll be ready to put your first batch in the oven. I used the amazing cast iron grill pan I splurged on in the fall, and it worked really well! I found that I could cook about 3 at a time, so I lightly dusted my pan with cornmeal and laid the calzones on the pan. Put 'em in the oven for about 5-7 minutes, then flip them over and cook for another few minutes.
Let them cool a little on top of the stove after you take them out, then eat like crazy!
Yum!!
Dad's Rice Pudding
Rice pudding was a staple of my childhood diet. Of course, at the time, I consistently demanded my dad make one bowl without any raisins just for me-- I've learned since then.
Without further ado, here's my dad's recipe - just as he said it.
Here goes:
(Based on 4 cups of uncooked rice)
Cook rice in oat milk (pressure cook or otherwise)
Put cooked rice in the bowl you are going to put in the oven.
Add oat milk until it is very soupy.
1 cup Agave syrup
1 teaspoon vanilla
1 teaspoon cinnamon
1 teaspoon salt
Add and beat in eggs (1.5 per cup of uncooked rice---gotta love those ½ eggs:)
One to two cups of raisins
Add a healthy dose of love
Mix until “frothy”
Put in oven at 350 for a least an hour (time can vary depending on size of bowl etc---just watch and don’t let it burn
Posted by
Lena
Labels:
desserts
Monday, July 13, 2009
Cheesy Potatoes and Green Beans
Oh my god you guys, last night I did something awesome.
I was rooting around in my fridge to find something for dinner, and came across a bag of new potatoes and a bag of green beans. What delicious thing could I concoct these ingredients, I asked? I thought back to my dinner on Saturday night at this delicious Eritrean restaurant where we were served an amazing okra in a tomatoey, oniony sauce-- and it dawned on me: I could make a tomato-ey, onion-y, and best of all, CHEESY, stew!
Ingredients
3 new potatoes, washed and cut into bite-sized-ish pieces
1 "bag" of green beans (1 pound? Maybe?)
1 small heirloom tomato
1/2 cup tomato sauce (in retrospect, I probably wouldn't have used this. It had too many of its own spices in it and overwhelmed the flavor of the dish. Try tomato paste, or just a bunch of fresh tomatoes chopped up!)
a little less than 1/2 cup water
1/2 a sweet onion
1 clove of garlic
coriander
cumin
salt & pepper
Do It!
- Saute chopped garlic with a dash each of the spices until it starts smelling awesome.
- Add the onions and cook for a few more minutes, then add the chopped tomato(es).
- Cook these for a few more minutes, then add the potatoes and cook for (another) few minutes.
- Add water and tomato sauce, stir well, cover and cook for 4-5 minutes or until the potatoes aren't quite hard as rocks anymore.
- Add the chopped green beans, stir and re-cover. Cook everything together for a few more minutes until all the liquid is more or less dissolved.
- Add finely grated sharp cheddar cheese, more salt, and pepper to taste.
Tada! I even had enough leftover for lunch today. This would be an excellent potluck dish and makes for easy and yummy leftovers!
Posted by
Lena
Labels:
cheese,
CSA,
dinner,
green beans,
potatoes,
potluck,
Quick 'n Easy,
recessionistas,
vegetarian
Summer Fruit Crisp
Here's another stellar selection from one of my favorite blogs, smitten kitchen. I've made this one two or three times since I first found the recipe, and have been changing it slightly to fit my tastes each time. These have served me very well as work-day breakfasts--with a little yogurt--and I've added many different types of fruit. Delish!
The ingredients are very variable depending on how much fruit you use. I haven't measured it very exactly, so you'll just have to see what works for you!
Ingredients
For the filling:
6 or 7 very ripe apricots
2 ripe peaches
blueberries
raspberries
3 or so tablespoons of flour
2 or 3 tablespoons of sugar
Honey
For the crumbles
2 cups old fashioned rolled oats
1 cup flour
a little sugar
a little salt
2 tablespoons of butter, melted
About 1/2 a cup (I think? Maybe more...) warm water-honey mixture
a few dashes of cinnamon and nutmeg on top
Preparation
Preheat oven to 350.
Prepping the fruit--specifically the apricots--is the best part of this dish. Just tear them into quarters and plop 'em in a bowl. Tearing fruit! Awesome!
Mix all the "for the filling" ingredients together in a bowl, then transfer to a baking dish. Mix the dry ingredients and spices together in a separate bowl, then add the butter and water-honey mixture until you have a crumbly mixture. Don't over-water! Add the liquids slowly and stop when chunky clusters start to form.
Spread the crumbles evenly over the top of the fruit in the baking dish, then bake for 25-ish minutes. Keep an eye on it once you pass the 20 minute mark; you're looking for bubbling to indicate it's done. If you let it go too long the fruit will bubble up all on the sides and swallow the crumbles. You can eat it hot with ice cream or cold with yogurt. I've been eating it for breakfast and it is perfect that way! Enjoy!
Halibut
That, my friends, was one delicious piece of halibut. I sort of followed this guy's advice, which was very helpful-- but I did some tweaking.
Here's how it happened:
Ingredients
Halibut
Milk
Butter
Seasonings (I just guessed. Mostly thyme I think? That sounded good.)
Preparation
Preheat your oven to 375
Place the (cleaned) halibut in a dish, as shown, with some milk (or soymilk) not quite covering the fish. Throw some spices on there: as I said above, I just guessed about what I thought might go well. I think I ended up with some thyme, basil, salt 'n' pepa (dur) and maybe garlic salt? Maybe. Experiment with other spices! Hooray!
Then, throw a patty of butter on the top. Mmm, butter.
The recipe I was working from suggested cooking this bad boy for 1.5 hours in a 325 degree oven. I think it was closer to 25 minutes at 350 degrees--- but honestly, I don't remember. Sorry! You'll just have to ballpark it.
I think I remember this needing a little salt, so maybe add some extra salt with those spices. Maybe adding paprika or chili flakes or something might also be good. Who knows! The kitchen is for experiments. Rah! (Dinosaur noise)
Posted by
Lena
Labels:
dinner,
fish,
Quick 'n Easy
Tuesday, June 23, 2009
Fathers Day
As many of you know, my Dad is pretty awesome. Especially in the kitchen--- most of whatever little culinary intuition I might have comes from watching him. I can't even count how many times I've called him to ask how long I should bake a potato or if it's safe to put a pyrex bowl in the oven.
I have a couple other "Dad" recipes I should put up here sooner or later, but seeing as it was just Fathers Day and he recently sent me this beautiful recipe, I thought this would serve well as a debut. He even included a lovely photograph to accompany the instructions!
Enjoy.
Super Easy Baked Custard --- with Cinnamon and Nutmeg
Ingredients:
4 cups “plain” rice milk (Pacific Foods brand preferred---although other brands and soy milk would likely be fine)
5 eggs
¼ teaspoon sea salt
4 tablespoons Agave Syrup sweetener
Tiny pinch of Nutmeg
Cinnamon “lightly” sprinkled to cover top
Preparation:
Beat together milk, eggs, salt, and sweetener. Pour into custard cups; place cups in a pan with hot tap water nearly to the top of the custard line. Sprinkle on the cinnamon and nutmeg and bake at 325 degrees F for about 90 minutes----or until custard is set. This varies widely with the depth and size of what you are baking the custard in. A knife inserted in the center should come out clean. Makes 6----1 cup size----Pyrex custard cups. Best chilled after baking-----then eat like crazy!
Posted by
Lena
Labels:
desserts
Saturday, May 2, 2009
Greek-ish Pasta
I love this pasta. It is amazingly easy and delicious, my two favorite things when it comes to food! This is definitely a potluck-worthy dish, as well. Great for the summer!
Ingredients
Pasta
Feta
Kalamata olives (pitted)
Olive oil
Thyme
Basil
Oregano
Any other yummy herbs you have on hand (except parsley... I hate parsley.)
Do ittttt
Make your pasta (if you need help with this... google it?)
Make your herb-and-olive-oil dressing:
- Put olive oil in a bowl (I just kind of guess on the quantity. Obviously it depends how much pasta you're making, but if I make enough for just me I would guess that I use a tablespoon and a half. But that's a guess.)
- Add herbs (I use dried b/c I never have fresh, meh)
- Swirl it around
Chop up your olives and crumble your feta. When the pasta is done, drain well and then put it back in the pot. Add your olive-oil-and-herb dressing and mix well. Transfer the pasta to a serving receptacle and top with olives and feta.
Enjoy!
Posted by
Lena
Labels:
potluck,
Quick 'n Easy,
vegetarian
North African Carrots
These carrots were pretty bomb, you guys. Great side dish-- found in a lovely new cookbook, Molly Katzen's The Vegetable Dishes I Can't Live Without. Here's what I did.
Ingredients
Olive oil
1/2 teaspoon cumin seeds (I didn't have these at the time so I just used extra ground cumin)
2 teaspoons ground cumin
1 teaspoon cinnamon
1 teaspoon unsalted butter
1 teaspoon minced or crushed garlic
A bunch of carrots. 10 medium-sized ones maybe?
salt
2 tablespoons orange juice
2 tablespoons lemon juice
a touch of honey
Process
- Preheat the oven to 400 F. Line a baking sheet with foil, and spray with nonstick spray.
- Heat olive oil in a large, deep skillet. Add cumin seeds and toast them for a few minutes until they become fragrant and slightly browned. Add the ground cumin and cinnamon and cook them all together for a few more minutes.
- Melt the butter in the pan with the spires, then stir in the garlic. Add the carrots, stirring them around until thoroughly coated with the spice mixture. Sprinkle in the salt and orange juice, and stir well. Cover and cook over medium heat for 5 minutes, stirring periodically. Transfer the whole shebang to the baking sheet, spreading all the carrots out into a single layer.
- Roast the carrots in the oven for 15 minutes, stirring once or twice. Remove the tray from the oven and let the mixture cool for about 5 minutes. Pour the carrots out into a bowl and add the lemon juice and honey.
Tada!
Posted by
Lena
Labels:
carrots,
side dishes,
vegetarian
Sunday, April 26, 2009
Lamb-Stuffed Peppers
Thanks again, bread and honey... I fell in love with this amazing recipe as soon as it was posted, and made it soon thereafter. Total hit! Lamb is far and away my favorite red meat, and mixed with tarragon and feta all stuffed inside a delicious roasted bell pepper... divine. I decided to make it again tonight, and it's making the blog cut! Aren't you all lucky.
Ingredients:
A couple of bell peppers
1/2 a pound of ground lamb
1/2 a red onion
a few cloves of garlic
Fresh tarragon
Myzritha cheese (a greek sheep's milk cheese) -- I used feta which I think is a lovely substitute for the kind of hard-to-find Myzritha
Some kick (cayenne, chili flakes, etc)
Some oregano
Process:
1. Cut the top off your bell peppers, pull out the seeds and put them open-side down on a baking sheet. Drizzle some olive oil over the tops and roast in the oven at 400 degrees until the skins start to blister a bit -- not too much, or you'll end up with a soggy pepper. Take the peppers out and allow them to cool, then peel the skins off.
2. Saute your lamb with diced onion and garlic, add some salt & pepper and some oregano & kick if you desire. Cook until meat is just done, then remove from heat. When it's cooled, stir in some crumbled feta and fresh tarragon (seriously-- fresh is super important here. The tarragon absolutely makes this dish).
3. So bread & honey suggests doing crafting and adorable--and functional--parchment paper boat for your peppers & rice. I did it the first time but this time I didn't have any parchment so I used tin foil. You'll have to reference her post to see the real deal-- but tin foil worked very well! Another project for today was making chicken stock, so I used some of that to make some brown basmati rice that I ate with the stuffed pepper. Yum!
Pre-Summer Fruity Treat
Yum! Last week Terra Firma sent me a lovely basket of fresh, delicious strawberries. They are so good! I'm a little at a loss for what to do with them other than just eat them whole, so that's probably what I'll end up doing. I did come up with this delicious combo earlier: Ben & Jerry's Peach Cobbler Ice Cream + Strawberries. Simple, easy, and delectable. The Recessionista's dream!
It's pretty much what it looks like. Throw some ice cream in a bowl and top with sliced strawberries. Delish!
Posted by
Lena
Labels:
CSA,
desserts,
recessionistas,
Terra Firma
Monday, April 20, 2009
Vegan Biscuits!
Tonight I made the quickest, easiest, yummiest biscuits in the world, thanks to bread and honey. I opted out of the soup because it is 1,000 degrees here (even now, at 9:30pm). Make these, seriously it'll take you 15 minutes (plus 15 in the oven). Yum!!
If those don't look like the kind of thing a dinosaur would eat (or at least what he would make after he ate...) then I don't know what does.
"Fancy Biscuits"
2 cups flour
2 tsp baking powder
1/2 tsp salt
2 tbsp vegetable oil -or- shortening
1 cup soy milk
1/2 cup green onions, chopped (I used regular sweet onions and they were scrumptious--just very onion-y)
1 tbsp dried dill
1/4 tsp pepper
A large handful of grated cheddar cheese.
Preheat oven to 450ºF. In a large bowl, sift together the flour, baking powder, and salt. Crack in some pepper, and toss the cheese and onions into the mixture until it's all evenly distributed. Add the oil and sour milk, and mix together gently until "just mixed." Spoon into lightly oiled muffin tins-- I just used a cookie sheet. Bake for 12-18 minutes. Makes about 6 biscuits, but for me it was more like 8.
Posted by
Lena
Labels:
baking,
Quick 'n Easy,
recessionistas
Thursday, April 9, 2009
Salmon!
Last night I made baked salmon for the first time ever. It turned out perfectly, fully cooked but still tender with none of the dry, cakey texture I hate in fish. My dad makes salmon all the time, probably twice a week, and he makes it so simply and it turns out so well--that I called him for some inspiration. Following his advice, I concocted a sweet-and-tangy marinade that soaked in deliciously for a subtle, mouthwatering flavor. Success!
I bought a little less than 2/3 of a pound from Safeway, which turned out to be exactly the right amount for Josh and me. It might have been nice to have lunch-leftovers, but there's always next time. I think I let the fish sit in the marinade for at least an hour, which definitely helped with the flavor and tenderness.
Marinade
1/4 cup Balsamic Vinaigrette Dressing
1/4 cup Agave nectar
a splash of soy sauce
Mix those ingredients together and pour them over the fish, which should be in a pan with high enough sides to accommodate liquid covering the fish. It's best to use the smallest pan you have that will fit your piece of fish for this, so the marinade doesn't become too diluted. Pour the marinade over the fish and add water until the fish is completely covered. Let sit for as long as you want, but at least 30 minutes. Pour the marinade out of the pan if you want to bake the fish in the same pan; I actually saved the marinade for use in the future, a plan I may or may not reconsider when the time comes. Also,
How I Cooked It
I would probably use a baking sheet or broiler pan to bake the fish instead of the glass casserole dish I used, as I ended up having to transfer the fish to the broiling pan for the last part of cooking anyway. Here's the basic idea.
Heat oven to 350.
Put fish in on middle rack, with an empty rack set to the highest placement.
Bake for 15 minutes.
Move fish to upper rack, broil for a little while (I forget how long-- 10 minutes? Maybe? Until it starts looking done.)
Remove, serve, enjoy!
yum yum yum. This fish will definitely make some reappearances, probably once a week. I need more fish in my life.
P.S. -- My stepmom filled me on in the secret my dad forgot to share with me: You know the fish is done when the fat starts to bubble out. Very appetizing, I know, but it works!
Friday, April 3, 2009
New cookbook!
Hello after another long hiatus! Sorry. The month of March was just mad busy. And April probably won't be any better--but I'm trying! See last post for rationale/action items going forward (dontcha love that workplace jargon).
I thought I would start this re-start with an update on the (second) most exciting recent addition to my kitchen:
The New Vegetarian Epicure, by Anna Thomas
Beautiful, non?
I have already made tons of delicious recipes from this book! It has given me so many great ideas for using my CSA goodies each week. This book has recipes for all the "building blocks" I wanted to learn how to make: basil pesto, sundried tomato pesto, tortillas, naan, pita bread, polenta, etc. etc. The best thing about it is that the book is organized by menus (AND SEASONS!), so if I ever need to come up with a bunch of delicious veggie food that all tastes great together, I have this at my fingertips!
I'll try to post everything I make from this book, but you know me. Let's start with an amazing, simple and economical soup I made at the beginning of March.
Greens and Garlic Soup
This soup has so much garlic in it, you guys. Basically that's the only spice. But, if you use some deliciously flavorful greens, you get all those nice subtleties in there too! I used spinach, dinosaur kale, and beet greens. The beet greens turned the broth nice and pink, which was a funny addition. The recipe suggests that 2-3 different types of greens is best for this soup, mixing stronger flavors with milder ones.
Ingredients
1 head garlic, separated into cloves, peeled & chopped
1 onion, chopped
2 Tbs. fruity green olive oil
1 bunch each of your 2-3 leafy greens (approximately 1 ½ pounds)
1 ½ lbs. russet potatoes, peeled & diced
2 cups water
salt & peppa
8 cups vegetable broth (or low-salt chicken broth)
¾ cup white wine (I think I left this out cuz I didn’t have any)
3 Tbs. rice vinegar
garnishes: additional olive oil, hot red chile pepper flakes, 6 oz. feta cheese (crumbled). I didn’t have the chili flakes or feta so I just heaped in some parmesan and it was AMAZING.
Instructions
Saute the garlic and onion in the olive oil in a large non-stick pan, until they begin to color. Wash the greens, trim away any tough stems and ribs, and shred the leaves with a sharp knife. If you’re using a sturdier green such as kale or escarole, add it to the pan when the garlic starts to turn golden, and sauté them together for a few minutes, stirring often.
Meanwhile, combine the diced potatoes, water, salt & pepper, and veggie broth in a soup pot and bring to a boil. When the potatoes are tender, add the garlic and onion mixture, all the shredded greens, the white wine, and the rice vinegar. Simmer everything together for about 30 minutes, then taste and correct the seasoning if needed.
The recipe says to put out a carafe of good green olive oil, some dried red chile flakes, and a bowl of crumbled feta, and serve steaming bowls of soup. As mentioned above, I didn’t have 2 of the 3 garnishes, so I just used parmesan. I love parmesan, so this was perfect for me.
YUM I ate this soup for SO many days you guys. Excellent with some crusty bread or hummus/pita (or pita chips).
There's some good-lookin' dinosaur food!
I thought I would start this re-start with an update on the (second) most exciting recent addition to my kitchen:
Beautiful, non?
I have already made tons of delicious recipes from this book! It has given me so many great ideas for using my CSA goodies each week. This book has recipes for all the "building blocks" I wanted to learn how to make: basil pesto, sundried tomato pesto, tortillas, naan, pita bread, polenta, etc. etc. The best thing about it is that the book is organized by menus (AND SEASONS!), so if I ever need to come up with a bunch of delicious veggie food that all tastes great together, I have this at my fingertips!
I'll try to post everything I make from this book, but you know me. Let's start with an amazing, simple and economical soup I made at the beginning of March.
Greens and Garlic Soup
This soup has so much garlic in it, you guys. Basically that's the only spice. But, if you use some deliciously flavorful greens, you get all those nice subtleties in there too! I used spinach, dinosaur kale, and beet greens. The beet greens turned the broth nice and pink, which was a funny addition. The recipe suggests that 2-3 different types of greens is best for this soup, mixing stronger flavors with milder ones.
Ingredients
1 head garlic, separated into cloves, peeled & chopped
1 onion, chopped
2 Tbs. fruity green olive oil
1 bunch each of your 2-3 leafy greens (approximately 1 ½ pounds)
1 ½ lbs. russet potatoes, peeled & diced
2 cups water
salt & peppa
8 cups vegetable broth (or low-salt chicken broth)
¾ cup white wine (I think I left this out cuz I didn’t have any)
3 Tbs. rice vinegar
garnishes: additional olive oil, hot red chile pepper flakes, 6 oz. feta cheese (crumbled). I didn’t have the chili flakes or feta so I just heaped in some parmesan and it was AMAZING.
Instructions
Saute the garlic and onion in the olive oil in a large non-stick pan, until they begin to color. Wash the greens, trim away any tough stems and ribs, and shred the leaves with a sharp knife. If you’re using a sturdier green such as kale or escarole, add it to the pan when the garlic starts to turn golden, and sauté them together for a few minutes, stirring often.
Meanwhile, combine the diced potatoes, water, salt & pepper, and veggie broth in a soup pot and bring to a boil. When the potatoes are tender, add the garlic and onion mixture, all the shredded greens, the white wine, and the rice vinegar. Simmer everything together for about 30 minutes, then taste and correct the seasoning if needed.
The recipe says to put out a carafe of good green olive oil, some dried red chile flakes, and a bowl of crumbled feta, and serve steaming bowls of soup. As mentioned above, I didn’t have 2 of the 3 garnishes, so I just used parmesan. I love parmesan, so this was perfect for me.
YUM I ate this soup for SO many days you guys. Excellent with some crusty bread or hummus/pita (or pita chips).
Tuesday, March 17, 2009
Quinoa Cabbage Salad
Holy crap you guys, I just did something awesome. Actually, today (with help from yesterrday), I did two awesome things, but this is the first post so you're hearing about this first.
Last week a big head of red cabbage arrived in my CSA box. "Pretty!" I thought. I've spent the last 5 days thinking of what to do with it. I've had this phrase kicking around my head--Quinoa Cabbage Salad--but I had few ideas other than shredding up cabbage and putting it in a bowl with some quinoa.
HOWEVER, that is exactly what I did just now, and it is AMAZING. Granted, I added some other things to increase the deliciousness factor, but it's pretty much just quinoa and a heck of a lot of cabbage.
1/2 head red cabbage (bee tee dubs--- this is a TON)
1/2 red onion
1 cup red quinoa
(did I mention this is the Communist Party Salad?)
Chicken breast
Salt and pepper to taste
The thing that I think makes this salad so freaking mouthwateringly scrumptious is the lemon vinaigrette I stirred up. Drizzle some over your completed salad and you will find yourself on a one-way plane to I-made-this-meal-in-under-20-minutes-and-it-tastes-SO-good bliss.
1 part Lemon juice
4 parts Olive oil
Some garlic powder (or minced clove)
Salt
Pepper
MUSTARD. About as much as the lemon juice, I guess.
Basically add them all together and keep adding different things until it tastes right to you. I made enough just for one salad, but you could technically make a bunch and keep it in the fridge for as long as you would regular salad dressing (I assume).
The other secret I should share is that I actually only ate HALF of this in one sitting. I intentionally made more so I could bring some to work tomorrow for lunch.
Posted by
Lena
Labels:
cabbage,
CSA,
lunch,
Quick 'n Easy,
recessionistas,
salads,
Terra Firma
Sunday, March 15, 2009
Starting again!
I'm sorry, I've been terribly lax about posting. I've been cooking, for sure, I just haven't had time to post about it! My main obstacle has been a nagging insistence on posting pictures with each entry. This is hard. My camera is not that great, and as such any picture I want to post ends up requiring a lot of Photoshop tweaking. Given my obsessive/compulsive tendencies, this ends up taking a long time. So, I don't even start, thereby dooming my posts before I ever even think about writing.
So from now on, I'm going to start writing, and if a photo or two ends up in the post later on, so be it. But I'm not going to keep my bad photos from dooming this blog! Not today!
See below for inspiration/motivation booster.
So from now on, I'm going to start writing, and if a photo or two ends up in the post later on, so be it. But I'm not going to keep my bad photos from dooming this blog! Not today!
See below for inspiration/motivation booster.
Posted by
Lena
Saturday, February 28, 2009
Extreme Domesticity
Okay guys, I did something really domestic the other day. I made a tart, specifically for dessert. Like, as part of complete meal. For some reason I see this as very domestic--which I'm pretty okay with, actually. This was the topper for the feast Josh and I made. I used this amazing recipe for a whole lemon tart from smitten kitchen, and it turned out really well! I cheated and used a frozen roll-out Pillsbury pie crust instead of the Unshrinkable Tart Shell recommended by smitten kitchen, but it worked out ok. It did shrink a little, but we had a little less filling (because I used less sugar) so it wasn't too much of a problem.
First, put one of your oven racks in the center of the oven and pre-heat to 325. Temperature is important here so don't mess up! :)
So here's me, mixing up the ingredients in my little food processor.
Mix together:
1 average-sized lemon. This should be a Meyer lemon because they are sweeter than normal lemons. Otherwise, compensate with more sugar. You want to slice this into thin strips, remove the seeds and throw the whole thing into the food processor. That's why this is called a "Whole Lemon Tart." Meyers can be hard to find outside of California (sorry ladies, just move here already!!) but you might get lucky. I got one in my CSA when I made this so it was EXTRA good.
1 1/2 cups (300 grams) sugar. I actually used just a cup b/c I'm not big on the sweets.
You'll want to mix the above two ingredients together until thoroughly blended, then add the rest of the ingredients.
1 large egg
1 large egg yolk
1 1/2 tablespoons (12 grams) cornstarch
1 stick (4 ounces; 115 grams) unsalted butter, melted and cooled. I also only used half a stick of butter, but we ended up with less filling so it might be worth it to go the whole 4 ounces.
Eventually, it will look like this:
Then, pour the filling into the tart shell. So as I mentioned above, I used a frozen roll-out pie crust from Pillsbury because I didn't have time/was too lazy to make the "Great Unshrinkable Crust" smitten kitchen recommends (I keep wanting to type "smitten kitten"... adorable), and it worked pretty well. Just plop the crust into the tart pan and fold the excess crust back in over the edges so the edges are a little thicker.
Since this is NOT a great unshrinkable crust, it will shrink, so it's important that you leave some space (at least 1/4 inch) between filling and crust-edge.
Then pop it in the oven and bake for 20 minutes. Increase the heat to 350 and bake for another 15-20 minutes, or until the top of the tart starts browning and looking dang delicious. Take it out of the oven and let it cool for at least 20 minutes, then devour with all possible rapidity.
It's amazing! And seriously, so easy. Try it! I hope that makes up a little bit for my lengthy absence. I promise I will try to be better from now on!
Pita Chips!
Last night Josh and I made an Indian feast, and it was amazing. We made literally the best food I have ever eaten. To go with it, we also made pita chips!
Pretty easy. Here's what I did:
3 whole wheat pitas, cut into triangles
some olive oil
garlic powder
salt
parmesan cheese
Mix the olive oil, garlic powder and salt together in a little bowl. With a pastry brush, brush the oil mixture onto the pita triangles, which should be arranged on a cookie sheet (see above). Top each with a sprinkle of parmesan cheese, and bake them in the oven for 10 minutes at 350. Tada! You might need to adjust the cooking time, so check them after about 5 minutes to make sure they're not burning.
Posted by
Lena
Labels:
Indian
Thursday, February 26, 2009
Veggies and Spice
I didn't take any photos, but yesterday I was serious craving a large plate of veggies with some spice so I threw together this curry recipe, which was mostly made up and didn't use too many exact measurements:
Ingredients:
Canola Oil
Seaseme Oil
A couple cloves of garlic
2 inch piece of fresh ginger
cumin
cinnamon
nutmeg
cumin
cardomom pods
cayenne
coriander
curry powder
salt
pepper
1 red pepper, cut into 1 inch pieces
1 onion, cut into 1 inch pieces
1 head of broccoli, cut into florets
1 small package of hard tofu, drained and sliced into 1 inch pieces
some water
small can of coconut milk
fresh basil
Heat the oils (just a little of the sesame) on a low heat in a saute pan or a wok and then add the garlic and ginger.
Saute for a few minutes and then add the spices (to taste- i used about 1/2-1 teaspoon of each, except for the cayenne which i used a bit less of- that stuff is potent), mixing them into the oils and heating the paste for about a minute.
Throw in all of the veggies and tofu.
Toss everything together so the veggies are coated with the spice mix and pour in a little water- just enough so nothing burns.
Continue adding a bit of water and sauteing until the veggies are slightly tender, then add the coconut milk and basil and mix everything well.
Once the coconut milk is incorporated, pour the curry over rice and enjoy.
The best part of cooking this is how delicious it smells. It also looks beautiful with the yellow curry, red pepper, and green broccoli. Leftovers for lunch tomorrow!
Posted by
Lou
Wednesday, February 25, 2009
CSA Numero Dos
Hooray! Talk about from famine to feast. This week I got a TRUCKLOAD of produce. I decided to bring some bags and transfer it from the box at the pick-up house, so unfortunately, no nice picture today. But this is what I got:
- 2 HUGE oranges
- 1 grapefruit, and one other thing that my roommate insists is a "pomelo" but is probably just a bigger grapefruit
- 2 of the biggest leeks I have ever seen. Seriously, we're talking palm fronds here.
- 4 sweet potatoes
- salad greens
- broccoli
- cauliflower
- 3 beets! Yay!
- Fuji apples!
- More delicious carrots
- DINO KALE (woo!)
So excited! This is a whole lot more than last week, so I'm going to have to try real hard to use all of it. In celebration I made this delicious and easy recipe from eat me, delicious.
All you need are 2 sweet potatoes, 1 of the HUGE leeks, a cup and a half of cheese (I used cheddar), half a stick of butter, and some salt & pepper. Slice up the taters nice and thin, cut off the palm fronds from the leeks and just use the white and light-green parts (clean them really carefully--mine were pretty muddy). Slice those up too, cross-wise. Melt the butter in a large bowl, add the potatoes and stir them around with some salt and pepper. The recipe said to line a 9-inch cake pan with parchment paper, but I didn't have any so I just sprayed some pam in the pan. Then line the pan with sweet potatoes and cover them with a layer of grated cheese and leeks with some salt and pepper. Layer more yams, then more cheese and leeks, then more yams. Press the whole thing down with a spatula and put it in the oven at 350 for 70-80 minutes, or until the sweet potatoes are tender.
Check out those leeks!
Posted by
Lena
Labels:
CSA,
French,
Quick 'n Easy,
sweet potatoes,
vegetarian
Vegetarian Moussaka...
...isn't like real moussaka at all. And it's way not worth the effort. Again, allrecipes.com: Vegetarian Moussaka - Allrecipes
I could see this being really good with a pasta base, or something. It's good, but not great as is.
Posted by
Becca B
Tuesday, February 24, 2009
A big pot o' soup
Thanks for the inspiration, Food Junta! Last night I got home from yoga and decided to use up the rest of my CSA box. I was fantastically successful! We were conducting interviews for the used-to-be-a-living-room empty room in our house, which meant I needed a meal that could just hang out while I participated in the get-to-know-you chatter. Food Junta gave me the idea of a soup with leeks AND onions, and I took it from there. I also got to use my new (enormous) soup pot, which was exciting.
Here's what I did:
Cut up half an onion and 3 leeks and sauteed them with some garlic until they got soft. I accidentally started boiling the 2 carrots and 2 potatoes I'd chopped up in a separate pot because I misunderstood the directions (duh), so I scooped them out of that pot and put them into the bigger one to saute with everything else. I also threw in the half of a cabbage head I had left over, chopped up nicely. After a few minutes I added a bunch of water & chicken stock (didn't have vegetable, which might have been yummier), salt and pepper, and a bay leaf and waited for it to boil. I also threw in a can of tomatoes for good measure. I dramatically underestimated how LONG this huge pot of soup would take to boil, and seeing as how I had accidentally cooked the potatoes and carrots a bit already, I decided to cut down on the simmering time and eat it after about 15 minutes. I toasted a few slices of the wheat bread I made last weekend, added some parmesan and TADA! Delish.
I'm also filing this under "recessionistas" because it can be made MAD cheaply. Basically with whatever you have in your fridge/cupboard. Also no expensive spices required! And I'm definitely getting at least 3 meals out of this. I brought some in a tupperware for lunch, and soup is always better a day or so after you make it. The flavors just soak in so nicely!
If I used chicken stock does it still count as veggie? :)
Posted by
Lena
Labels:
dinner,
recessionistas,
soup,
vegetarian
Monday, February 23, 2009
M&Ms
Just a quick vote, because I'm bored: Favorite M&Ms:
Plain, Peanut, Peanut Butter, Dark, or Almond?
Posted by
Becca B
Sunday, February 22, 2009
Nutty Rosemary Bread - with a cereal digression
This is my very firstest post ever - Rosemary Pecan Bread:
A disclaimer: Joey made this bread. There, I said it. He also makes a white bread called "Amish white bread" (also on allrecipes.com) that is really freaking good.
I make cookies mostly. And sometimes damn good fajitas. And curries. Also bowls of cereal. [Let me take a moment to talk about cereal. I LOVE cereal. And I love mixing various cereals. Probably my favorite combination is shredded wheat, puffins, and granola. But recently I've just been eating the Market Basket (for non-east coasters, think cheap Safeway) brand of cheerios with granola. Lena, I need to make your granola! What if I do that today? I just miiiight. I'm going to go look for it. Here: http://www.cdkitchen.com/recipes/recs/146/Homemade_Granola38838.shtml]
But I felt like blogging about this bread because I think all y'all would really really like it. It's a good sandwich bread, but I just had it with eggs for breakfast.
Nutty Rosemary Bread
0.25 oz active dry yeast
2.5 cups warm water, divided
3/4 cup whole wheat flour
1/4 cup olive oil
1/4 cup honey
3 tblsp cornmeal
1 tblsp dried, crushed rosemary
2 tsp salt
5 cups bread flour
1 cup chopped pecans
1 egg, beaten
1. In large bowl, dissolve yeast in 1/2 cup warm water. Add whole wheat flour, oil, honey, cornmeal, rosemary, salt, 1 cup (bread) flour and remaining water. Beat until smooth. Add pecans right before kneading. Knead until smooth and elastic, about 6-8 minutes. Place in a bowl coated with nonstick cooking spray, turning once to coat top. Cover and let rise in a warm place until doubled, about 1 hour.
2. Punch dough down. Divide in half; shape into two loaves. Place in two 9-in. x 5-in. x 3-in. loaf pans coated with nonstick cooking spray. Cover and let rise until doubled, about 30 minutes.
3. Brush egg over loaves. Bake at 350 degrees F for 35-40 minutes or until bread sounds hollow when tapped. Remove from pans to wire racks.
Saturday, February 21, 2009
Bulk Food Goodness
Today was a very productive day, food-wise. On craigslist, I found a brand new Calphalon soup pot for much less than I would have otherwise paid, so I went out to the Sunset to pick it up. Luckily, the woman's house was right on the N, but it was all the way on 47th street so it still took me a good 35 minutes to get there. In a lovely confluence of events, there is a fantastic store called Other Avenues, an organic and natural foods store boasting an impressive bulk foods section.
The Bounty:
So excited! I just put together another loaf of bread with the whole wheat flower. It's rising in the loaf pan now and almost ready to go in the oven!
Have I mentioned that I love grocery stores? This one is the most fun I've had in a while. There's something satisfying about weighing out your own bulk ingredients, especially the spices. ESPECIALLY when the whole total (including a lovely tote bag you can just see under all the goodies up there) comes out to just over $30. Happy Saturday!
Posted by
Lena
Labels:
bulk,
grocery stores,
supplies
Cauliflower Curry
Yum! Last night I got together with Danny, Steven and Steven's roommate Tamara for dinner and board games. We made this recipe and it turned out really well! Here's what we did.
Ingredients:
Olive oil
Garlic
1/2 teaspoon ginger
1/2 teaspoon salt
1/2 teaspoon turmeric
1/2 teaspoon cayenne
1/4 teaspoon cinnamon
1/2 teaspoon coriander
1/2 teaspoon mustard seeds
1/2 teaspoon cumin seed
2 heads of cauliflower, cut into florets
some water
half a bag of frozen peas
a couple of fresh cherry tomatoes and a can of whole
Amazingly, I had all the required ingredients in my kitchen! I was really surprised that I had all the spices, but I have been on a spice-collecting jag. Also some of them were my roommates'.
So, we chopped the garlic and sauteed it in a HUGE pan (with a lid--important) with some olive oil, then added all the spices. It started smelling awesome, so we added about 1/4 cup of water and the cauliflower, lidded it and let it stew for 10-ish minutes. Once the cauliflower was a little tender, we added the peas and stirred it for another few minutes, then added the tomatoes. Once they were hot, it was done! Easiest meal in the freaking world.
While the curry was cookin' away, Danny made rice and heated up some garlic naan in the oven. Voila, delicious dinner! It turned out really well, but a little spicy for me--I'll cut the cayenne next time. This is definitely entering my regular cooking repertoire!
Posted by
Lena
Labels:
Cooking With Friends,
Indian,
Quick 'n Easy,
vegetarian
Friday, February 20, 2009
Great Minds
Hey, friends. Just thought I should post about this. Phoebe (in purple) is a wonderful woman (B'07) who sent me a message on facebook about her blog with her roommate Cara about....being a 20-something who wants to cook awesome-and-cheap food. Looks like there are a lot of recessionistas out there.
Posted by
Jenn
Labels:
blogs,
community,
recessionistas
Thursday, February 19, 2009
Omg, bread.
This weekend, I made a miraculous discovery. BREAD: easy to make and delicious!
I used this amazingly simple recipe and made three loaves in three days. I am SO proud of this bread you guys--you have no idea. It's very basic but SO yummy. A little too buttery for sandwiches or soups, but perfect for toast.
This is what it looks like. Yes, that is the most beautiful slice of toast you have ever seen.
When I told my mom about my bread making adventures, she told me about bread she used to make with onions and dill. Sounds delicious! I'll have to start experimenting. I'm also planning on using wheat flower and less butter/sugar. Yummy bread ideas anyone?
I used this amazingly simple recipe and made three loaves in three days. I am SO proud of this bread you guys--you have no idea. It's very basic but SO yummy. A little too buttery for sandwiches or soups, but perfect for toast.
When I told my mom about my bread making adventures, she told me about bread she used to make with onions and dill. Sounds delicious! I'll have to start experimenting. I'm also planning on using wheat flower and less butter/sugar. Yummy bread ideas anyone?
My Blogroll
So, I've heard that if you post too many links, blogger will suspend your account for a bit (this happened to the not of it men and women), but I am willing to take that risk with our accounts to share some valuable blogs that I read. Food, Farming, Freshness, Policy, Advocacy, Rooftop Gardens, etc etc. Read on:
Graze the Roof - Rooftop Garden Info on top of Glide Memorial Church in SF. Amazing.
The Green Fork Blog - The Eat Well Guide's Blog. Mostly posts written by interns and employees. Good stuff. Very topical.
City Farmer News - Urban Ag stories. I dig it. HA! Dig! Ha!
Civil Eats - The post-Slow Food Nation blog. Gordon Jenkins (one of the posters) is a new friend and says that they are always looking for more bloggers, if any of us are into the idea.
Bread and Honey - The most like ours - a collaboration of friends and food. Check it. I like it.
Food Junta - For the poor, empowered, and hungry (ie me next year. Shizeee, what am I about to do with my life?)
The Irresistible Fleet of Bicycles - Awesome. Everyone needs to read what they do (ie motivate
the young to farm and unite). Woot. Also they are going to be promoting their movie "The Greenhorns". We should keep an eye out.
I'm hungry. What to eat? Oh, the eternal question.
Sorry for the blog-poop. I thought I'd just share what I have.
XOXO
Wednesday, February 18, 2009
First CSA Box landed!!!
Today I went down to the Castro and picked up my first CSA box. Inside:
It's ok.... not really as much as I'd expected. But doesn't that produce look beautiful!!!
Tonight I'm making a couple of yummy things: one is garlic bread, which I just threw into the oven. I used half a loaf of Trader Joe's cheesy sourdough bread that was about to go bad, brushed some garlic, salt, olive oil and parmesan on the slices, and popped it in the oven wrapped up in tin foil. I found a recipe online instructing me to keep the loaf in the oven for 40 to 50 minutes, but that seems like a lot. I'm going to try 30 and see what happens.
Then, I'm making the recipe provided by Terra Firma for this week's box: Rice Noodles with Cabbage & Tofu. Here's the recipe:
This recipe meant I had to run down the street to the corner store and buy some vermicelli, which I'd never bought before but remember liking in Asian dishes at restaurants. I think I'm going to make the stir-fry version--it's cold, I need something warm and toasty. Speaking of which, I made some toast from the bread I baked yesterday (bread post soon to come). Yum!!!
RESULTS:
I need a bigger pan. Or a wok.
I had nowhere near enough room for all the cabbage, noodles and tofu to fit in the pan at once! Things kept falling out the sides and everything got a lot more cooked than I wanted it to be. Oh well. The sauce turned out pretty well, a little goopy but we added water. Even though the cooking didn't go as well as I'd hoped, the dish actually ended up being really delicious. And the garlic bread turned out well too. Leftovers for lunch!
It's ok.... not really as much as I'd expected. But doesn't that produce look beautiful!!!
Tonight I'm making a couple of yummy things: one is garlic bread, which I just threw into the oven. I used half a loaf of Trader Joe's cheesy sourdough bread that was about to go bad, brushed some garlic, salt, olive oil and parmesan on the slices, and popped it in the oven wrapped up in tin foil. I found a recipe online instructing me to keep the loaf in the oven for 40 to 50 minutes, but that seems like a lot. I'm going to try 30 and see what happens.
Then, I'm making the recipe provided by Terra Firma for this week's box: Rice Noodles with Cabbage & Tofu. Here's the recipe:
For the dressing, combine the juice and zest of 1 tangelo with 1 T. soy sauce, 2 T. olive oil, and 1 T. minced green garlic (stems and/or leaves).
Cook 2 C. dry rice noodles (“rice sticks”) in boiling water for 2 minutes. Drain and rinse.
Crumble 12 oz. firm tofu, then drizzle with 1 T. soy sauce and 1 t. sesame oil.
Cut a cabbage in half across its “equator”, and then shred one half (or both halves of a small cabbage) as finely as possible.
Toss the ingredients together, then let sit for 1/2 hour. Serve with fresh spinach leaves.
You can also make a stir fry using most of the ingredients:
After marinating the tofu, stir fry it until it gets crispy. Remove the tofu from the wok, then stir-fry the cabbage and noodles for 3 minutes and remove from the wok. Add the dressing ingredients minus the oil to the hot wok, then stir in 1 T. cornstarch mixed with 3 T. water. Stir until it begins to thicken, then return the other ingredients to the wok and stir fry for another 1-2 minutes along with a few handfuls of spinach leaves.
This recipe meant I had to run down the street to the corner store and buy some vermicelli, which I'd never bought before but remember liking in Asian dishes at restaurants. I think I'm going to make the stir-fry version--it's cold, I need something warm and toasty. Speaking of which, I made some toast from the bread I baked yesterday (bread post soon to come). Yum!!!
RESULTS:
I need a bigger pan. Or a wok.
I had nowhere near enough room for all the cabbage, noodles and tofu to fit in the pan at once! Things kept falling out the sides and everything got a lot more cooked than I wanted it to be. Oh well. The sauce turned out pretty well, a little goopy but we added water. Even though the cooking didn't go as well as I'd hoped, the dish actually ended up being really delicious. And the garlic bread turned out well too. Leftovers for lunch!
Posted by
Lena
Labels:
Asian,
cabbage,
CSA,
dinner,
garlic bread,
Terra Firma,
vegetarian
I LOVE UNCLE SAM CEREAL!!!! the dinosaurs definitely probably liked it too when they were frolicking around....i know you think this is a joke, but seriously.....
Ingredients
1 medium- to large-sized bowl/vesicle
a small summit of Uncle Sam cereal
a placid lake of Trader Joe's "original" flavored soy milk
1 spoon
10000 ready tastebuds
Ingredients
1 medium- to large-sized bowl/vesicle
a small summit of Uncle Sam cereal
a placid lake of Trader Joe's "original" flavored soy milk
1 spoon
10000 ready tastebuds
Posted by
10.44.00
Butternut the Juggernaut
So this might be the hardest time for anyone trying to eat "fresh" in Providence. The winters farmers market is filled with bread, meat, eggs, and value-added but the precious sweetness of peaches (though there still are apples, albeit close to the end of their shelf life) and the savory tastes of asian greens is a distant memory. BUT...if you were thinking ahead you might still have some reserves waiting patiently in a dark corner of your kitchen, the storage veggies. Now, my dark corner is not so dark so the potatoes and onions are sprouting but I still have my precious butternut squashes, the crowning jewel of my storage collection. I would love to break out in a long soliloquy about how we, me and the butternut squash, have a long and loving history but I have four potlucks to cook for this week and no time for that type of indulgence. So tonight, the agenda is stuffed butternut squash. General recipe:
-Cut butternuts in half and bake at 425 till tender
-While baking put some couscous, quinoa, and other grains in pot at appropriate time with some chicken stock (once the chicken stock is boiling, of course), cook
-when both are done, scoop most of the flesh of the butternut squash into a bowl and mix with your grain mixture, I also added some grated carrots and goats cheese- any other additions such as raisins, other cheeses, tomatoes would be great
-refill the shell of the butternut and bake for another 5 minutes
Onward and upward- next will be butternut squash soup. MMMM
Posted by
Nicole
Labels:
butternut squash,
dinner,
potluck,
vegetarian
Food for Dinosaurs-- Welcome
Welcome to Food for Dinosaurs!
This blog arose as I started becoming more invested in my food--what I buy, where I buy it, and how I cook it--and I wanted a place to collect all my thoughts and experiences in what feels like a completely new phase in life. Since moving to a new city in the fall and investing in some of my first "very own" cooking implements, I've been cooking and baking like crazy, and am just getting started. I'll pick up my first CSA box from Terra Firma Farms today, and I'm really excited to get going on some yummy seasonal recipes. I was looking around online for a seasonal/local/farmer's market-inspired food blog, and couldn't find much (though I'm sure there out there and I just improperly google'd), so I thought I'd contribute what I can.
My plan for this blog is to post a few times a week, depending on how busy I get. I'll usually talk about something I made, and hopefully include some pictures and the recipe I used. I'm also opening it up to some of my foodliest friends for their insights and experiences, so you'll see entries from all over the country soon enough!
The name: Some of the healthiest food you can eat comes in the form of big, green, leafy vegetables--the kind of food (herbivorous) dinosaurs would love!
Posted by
Lena
Subscribe to:
Posts (Atom)